

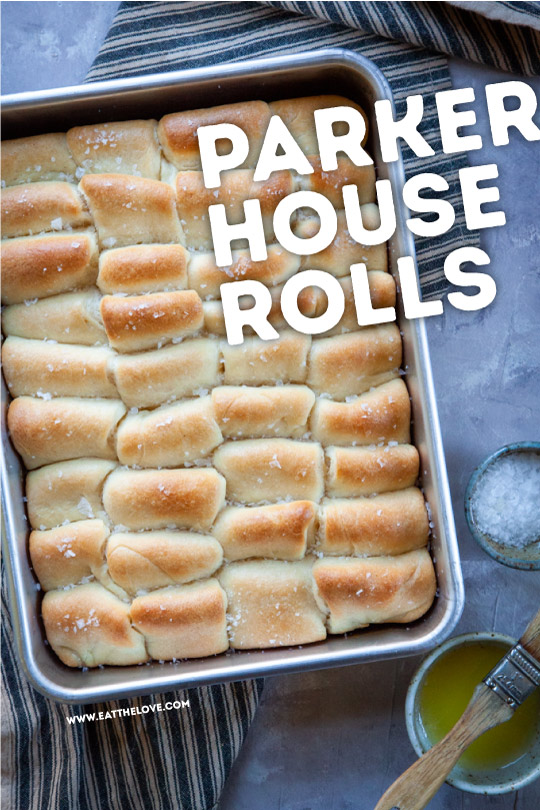
This easy-to-make variant of the original Parker House rolls recipe can be made the day before, turning them into overnight Parker House rolls!
Jump to Recipe
Ive stated in the past that I absolutely love Thanksgiving. Its one of my favorite holidays, with no pressure to get the perfect gift or make huge romantic gestures. Instead it focuses on food and food and MORE FOOD. And though the turkey is the main course, its the sides, like the green bean casserole, mashed potatoes and homemade cranberry sauce that often what folks gravitate toward. And though Ive made different rolls for the holiday table including my potato rolls, these parker house rolls appear nearly as often. In fact, I love these fluffy buttery rolls so much that I pretty make them all year around. I cant believe it took me this long to share the recipe!
What are Parker House Rolls?
Traditional Parker House rolls are a slightly sweet yeasted raised roll that are usually half circles, formed by cutting the dough into circles, then folded over. Fannie Farmers Parker House dinner rolls recipe is probably has the most popular version out there, having been initially published in her 1896 Boston Cooking-School Cook Book, the original title of her famous Fannie Farmer Cookbook.
But Stella Parks in her cookbook BraveTart talks about the original Parker House rolls recipe appearing as early as 1869 in Milwaukees Semi-Weekly Wisconsin with the headline Good Rolls The Famous Parker House Rolls. The original Parker House where the rolls were served, is a hotel in Boston (that is now called The Omni Parker House). It also happens to be where the original Boston Cream Pie is supposed to originate (though Stella Parks totally disputes that legend in her book!)
How do you make Parker House Rolls?
To make these Parker House Rolls, you first make the dough by warming the milk up on a stovetop. Dissolve yeast in it and then add warmed vegetable shortening, sugar, salt and an egg.
Then you knead the liquid into the flour using a stand mixer fitted with a dough hook. Let the dough rise and then roll out portions of the dough and cut into rectangles. Butter and fold the dough rectangles and place them in a pan.
Let the dough rise again. Or you can refrigerate overnight. Just bring the pan back to room temperature. Then bake and brush with more butter and a sprinkling of salt.
What makes this version different than the original Parker House Rolls?
There are numerous versions of the Parker House rolls but my version is adapted from a Bon Appetits Parker House roll recipe, where Ive streamlined the ingredients, clarified the steps, and adjusted the ingredients to make the dough easier to work with. Ive also reduce the sugar slightly as I prefer my rolls to not be as sweet as the Bon Appetit version, which uses more sugar.
The original (and most popular) Frannie Farmers Parker House Rolls doesnt have an egg in the original recipe and are shaped differently than the version that I make. I find the egg adds a tenderness that the original version doesnt have.
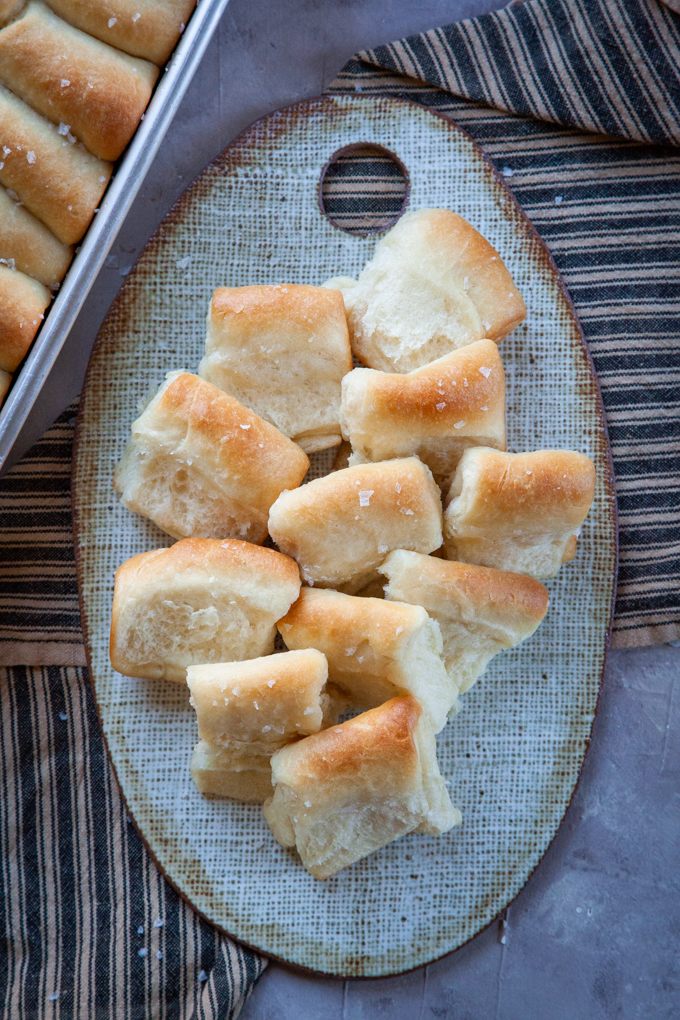
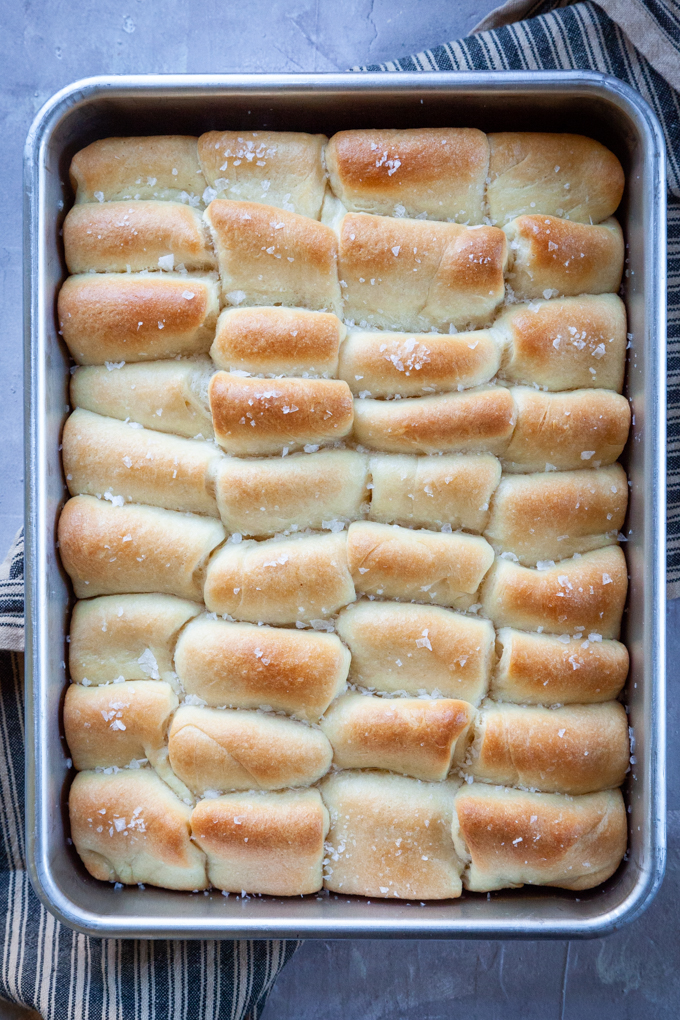
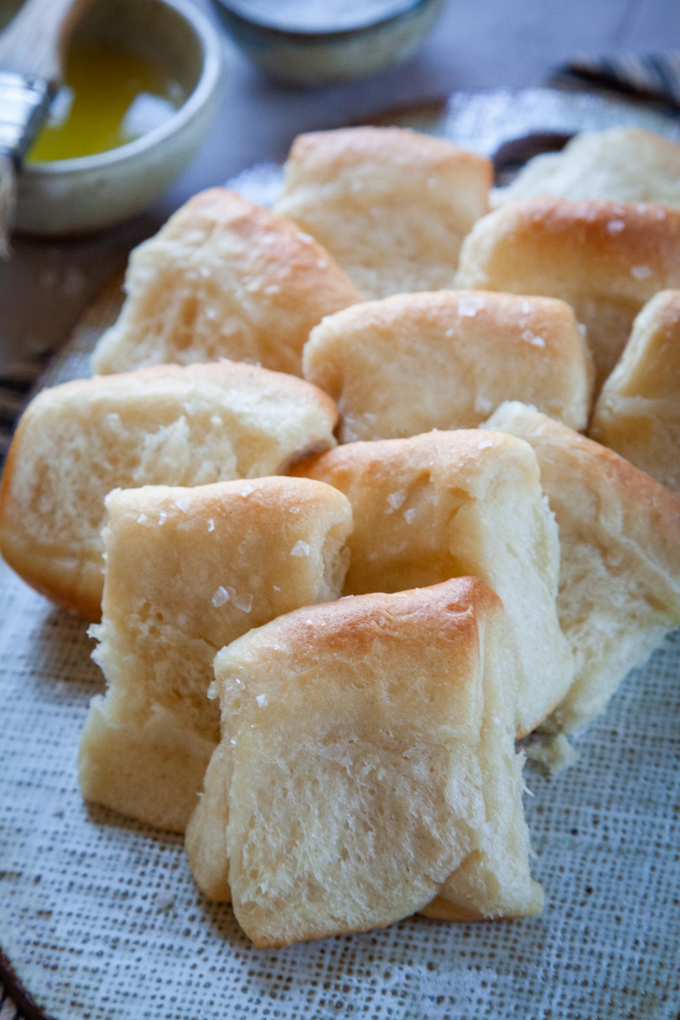
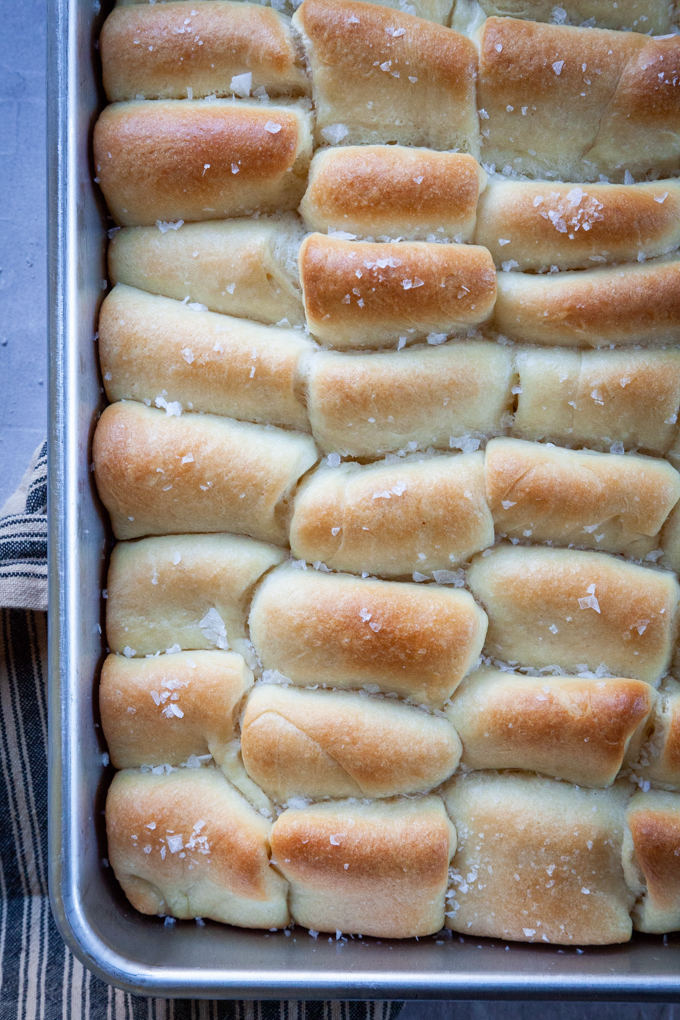
My version (as well as the Bon Appetit version) I dont cut the dough into circles, instead opting to cut them into rectangles and folding them over, then stacking them together in a pan. I love the way the bread nestles next to each other, creating soft billowy bread rolls similar to a pull apart roll. Cutting them into rectangles also means less scraps and less work when forming the rolls. No need to gather the scraps and reroll, which always leads to heavier rolls.
The folding over of the dough with the butter is still a nod to the original recipe, as well as ensures that every piece of bread has a little extra butter on the inside. And stacking them against each other means no roll unfolds in the rise and baking time, defeating all your hard work!
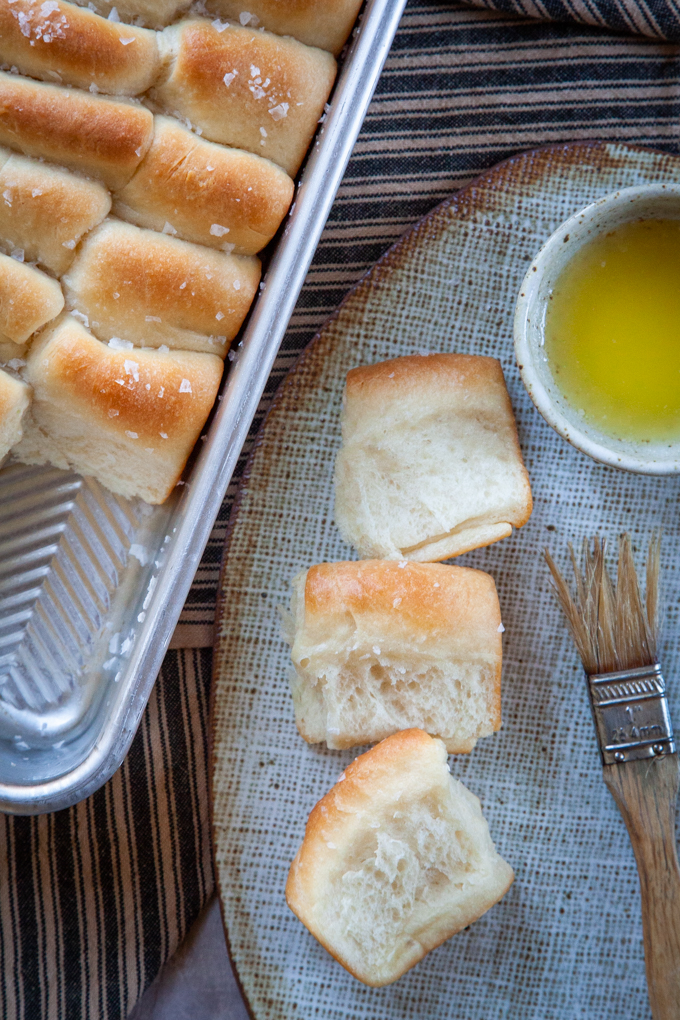
Finally, these Parker House dinner rolls have an extra brushing of butter on top (because you cant ever have enough butter) and a sprinkling of flaky salt on top to take it to the next level. The salt on top is optional but I cant imagine eating these without the salt on top!
Can you make rolls ahead?
You bet you can! There are two ways to make these rolls ahead of time and both are a super time saver, especially if you are looking to make these for a big holiday dinner or just want to simplify dinner.
You can make the dough, let them rise, and then then form the rolls and place them in the pan. At this point you need to let the rolls rise a second time, which will ensure they are extra fluffy and light. But you can turn these into overnight Parker House rolls by just covering them with plastic wrap and placing them in the fridge while you sleep. Move the rolls out onto the counter for about 60 to 90 minutes to bring them back to room temperature and let them rise a bit. Then bake as instructed!
Or you can just bake them completely, and then freeze them as is! Bake them but dont brush them with butter or sprinkle any salt on them. Let them cool completely and freeze them in the pan, tightly wrapped in plastic wrap after they have cooled or in a very large plastic resealable bag. Just bring them back out and place them on the counter for 2 hours before you want to serve them. Warm them up in the oven for 10 minutes on 350F and then brush them with melted butter and sprinkle of the salt. The rolls will keep fine in the freezer for up to a month.
How do you store leftover rolls?
You can store leftover Parker House rolls on the counter for up to 2 days. Just keep them tightly wrapped either in plastic wrap on in a resealable Ziploc bag. Dont refrigerate the rolls, as they will dry out. Keep in mind that day old rolls wont taste as good as fresh baked rolls. But if you warm them up again in the oven, and the brush them with a generous amount of butter, you probably wont notice!
You can also freeze the leftover rolls. I recommend breaking the rolls up into smaller individual rolls, then placing them in a gallon resealable Ziploc freezer bag. Having them already broken into individual rolls makes them easier to defrost and serve. Just leave them on the counter until they have thawed out, about 20 minutes. You can eat them at room temperature, but I prefer to reheat them in the oven or toaster oven for 5 minutes at 350F.
Can I substitute the vegetable shortening in these rolls for butter?
Yes you can. The shortening in these rolls gives a bounce and a fluffiness to the rolls that you just cant achieve with plain butter. But if you are adverse to shortening (and I get that, I use it very rarely), you can substitute 1/4 cup of butter for the shortening. Keep in mind the rolls will be slightly denser than the original recipe, but still pretty darn fantastic.
If you like these Parker House Rolls, check out some of other bread, rolls and buns recipes:
- Potato rolls
- Best Cornbread Recipe
- Beer bread with Cheese and Rosemary
- Pretzel Buns
- Angel Biscuits (developed for Simply Recipes)
And check out some of other recipes perfect for your Thanksgiving table
- Vegan Green Bean Casserole, gluten-free and paleo-friendly
- Easy Roasted Herb Potatoes
- Homemade Cranberry Sauce
- Garlic and Leek Mashed Potatoes
- Creamed Kale
- Brussels Sprouts with Pancetta, Candied Pecans and Parmesan
- Pumpkin Tart
- Mexican Chocolate Pecan Pie
Even more recipes (from friends around the internet)
I have joined up with a bunch of blogger friends for a Friendsgiving Virtual Potluck! Be sure to check the recipes below out for wonderful Friendsgiving and Thanksgiving recipe and craft ideas!
Appetizers
Baked Brie with Honey & Walnuts from Kelley of Mountain Mama Cooks
Bacon Ranch Cheese Ball Bites from Nicole of I am a Honey Bee
Reindeer Bacon Cheddar Cheese Ball from Julie of Julie Blanner
Salads
Sauteed Kale and Brussels Sprout Salad with Cranberries and Walnuts from Shashi of Savory Spin
Creamy Brussels Sprouts Salad from Faith of An Edible Mosaic
Main Dishes
Savory Vegetable Crisp from Bree of Baked Bree
Rosemary Lamb Steaks from Danyelle of The Cubicle Chick
Turkey Pot Pie from Kelly of Eat Picks
Side Dishes
Fried Brussels Sprouts from Erin of The Almond Eater
Cheesy Horseradish Mashed Potato Casserole from Renee of Kudos Kitchen by Renee
Cranberry Cream Cheese Dip from April of April Golightly
Sauteed Garlic-Butter Mushrooms from Linda of Simply Healthyish Recipes
Easy Cheesy Hash Brown Casserole Recipe from Mel of Adventures of Mel
Cornbread Stuffing with Chorizo from Isabel of Isabel Eats
Bacon Brussels Sprouts from Kara of Kara J. Miller
Crockpot Sweet Potato Casserole from Jennifer of Show Me the Yummy
Amazing Gluten Free Thanksgiving Stuffing from Sommer of A Spicy Perspective
Pumpkin Caramelized Onion Gratin from Denise of Chez Us
Crockpot Mac & Cheese from Leanette Fernandez of Funtastic Life
Cheesy Brussels Sprouts au Gratin from Rachel Gurk of Rachel Cooks
Drinks
Spiced Pumpkin Margarita from Sharon of Cupcakes and Cutlery
Breads
Sourdough Pull Apart Rolls from Erica of Buttered Side Up
How to Make Homemade Butterhorn Rolls from Mel of Flour on My Fingers
Sweet Dinner Rolls from Jocelyn of Grandbaby Cakes
Desserts
Sugar Pie from Julie of The Little Kitchen
Oatmeal Apple Crisp from Julie of Peanut Butter Fingers
Pumpkin Pie Milkshake from Eden of Sugar and Charm
Strudel Pastry from Justine of The Typical Mom
Tahini Hawaij Pumpkin Pie from Amy of What Jew Wanna Eat
Mini Apple Pie Bites from Lynsey of MoscatoMom
Kabocha squash pie from Hilah of hilahcooking
Pecan Pie Cupcakes from Courtney of Pizzazzerie
Coconut Cream Pie from Schnelle of Brooklyn Active Mama
Chocolate chip cheesecake from Jeannette of Hispana Global
Chocolate Pecan Pie from Kate of I Heart Eating
Mini Pumpkin Cheesecakes from Chelsea of Someday Ill Learn
Cinnamon Apple Crisp from Erica of The Crumby Kitchen
Turkey Donut Race Cars For Thanksgiving Treats from Theresa of Chewable Structures
Crafts and Centerpieces
Cinnamon Stick Holiday Candle Place Setting from Alli of Made with HAPPY
Metallic Pumpkin Luminaries from Amy of As The Bunny Hops
Easy centerpiece that will stun + party favor from Noelle of Oh Happy Play
Parker House Rolls
Ingredients
Dough
- 1 1/4 cups whole milk
- 2 1/4 teaspoons active dry yeast 1 package or 7 g
- 1/4 cup vegetable shortening 45 g (or unsalted butter, 57 g)
- 2 tablespoons white granulated sugar
- 1 1/2 teaspoons kosher salt
- 1 large egg
- 4 cups all-purpose flour 560 g
- 4 tablespoons melted unsalted butter divided
To Finish
- 2 tablespoons unsalted butter
- 1 teaspoon flaky sea salt like Maldon salt (optional but recommended)
Instructions
-
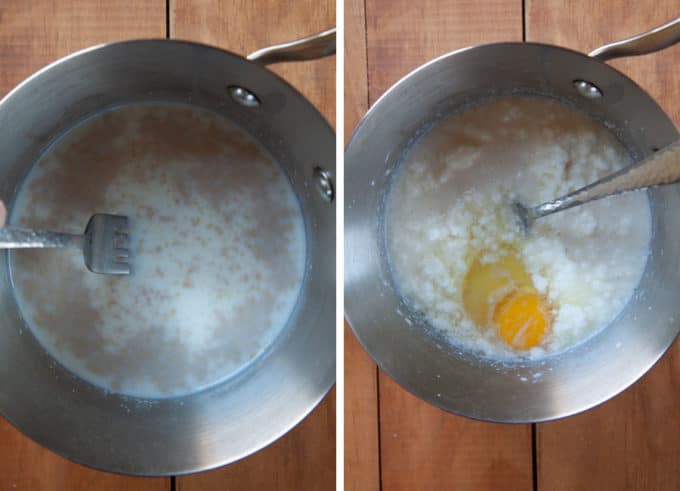
Place the vegetable shortening (or butter) in a small microwaveable bowl and cook for 30 seconds. Its fine if the shortening is only partially melted.
-
Place the milk in a medium sized sauce pan and heat up briefly on the stovetop, until it is warm to the touch, about 100 to 110 F if you have a thermometer. Add yeast and stir to dissolve. Add the partially melted shortening to the milk with the yeast, along with the sugar and salt. Mix with a fork, breaking up any large chunks of shortening that hasnt melted. Beat in the egg.
-
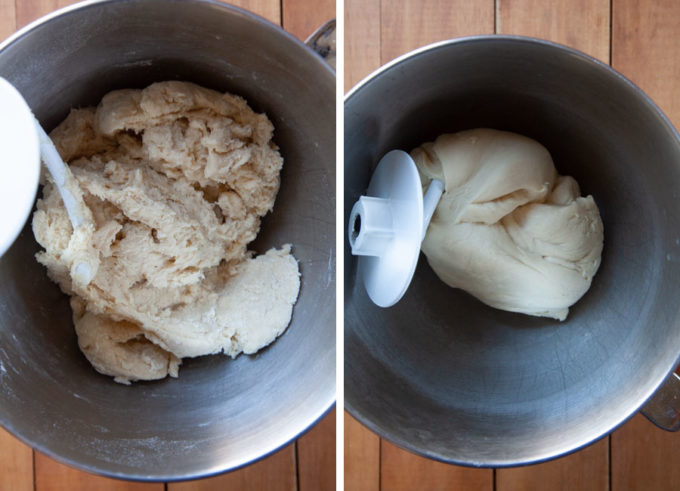
Place the flour in the bowl of a stand mixer fitted with a dough hook. Add the liquid, scraping any chunks of residual shortening into bowl.

-
Turn the mixer on slow and let the dry ingredients slowly absorb the liquid. Once the dough forms and pulls away from the side of the bowl, increase the mixer to medium speed and knead the dough for 4 minutes, or until the dough is smooth and supple.
-
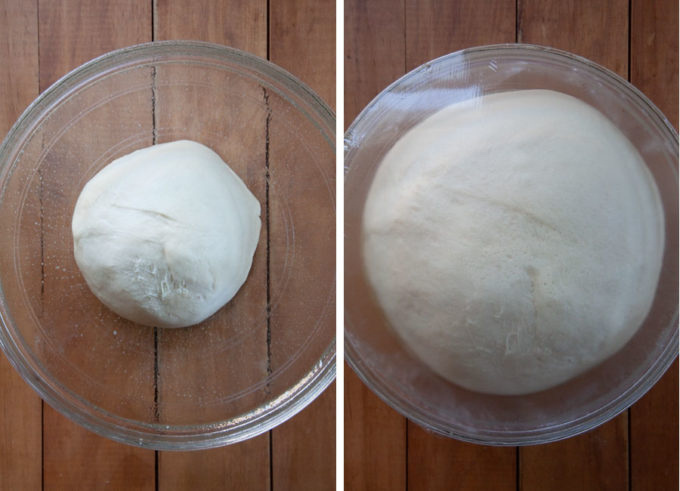
Spray or grease a large bowl with cooking oil. Form a smooth dough ball and place the rough side of the ball down into the bowl, leaving the smooth side up. Cover with plastic wrap and let rise in a warm place for 90 minutes, or until double in size.
-
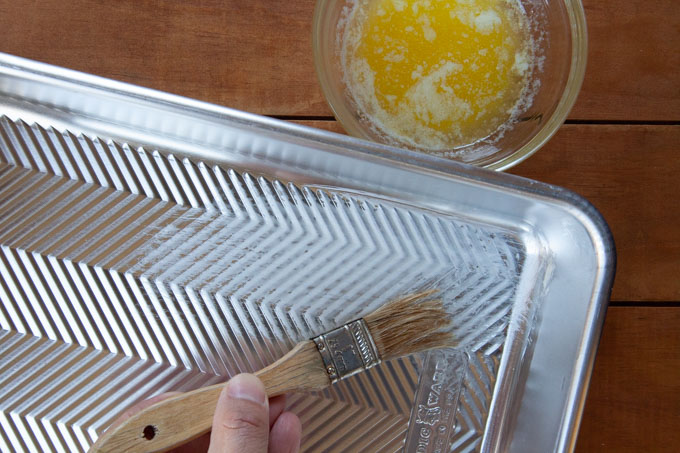
Once the dough has risen, take some of the melted butter and brush the inside of a 9 x 13 baking pan until the entire pan and sides is covered.
-
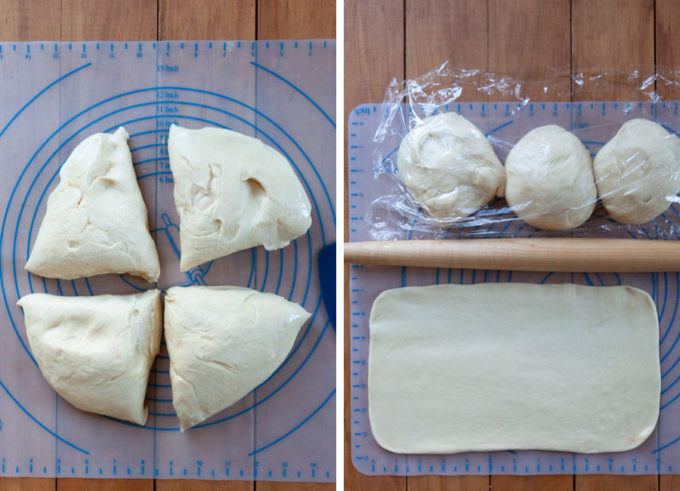
Dump the dough onto a clean surface. Divide the dough into 4 parts. Cover three parts with the plastic wrap to keep them from drying out, and roll out the fourth dough into a rectangle, 12 x 6 inches, with a rolling pin.
-
Cut the rectangle into three long 12 x 2 inches strips lengthwise. Cut each strip across into thirds, creating 9 smaller rectangles, 4 x 2 inches in dimension.

-
Brush half of one of the rectangles with melted butter, then fold it over.
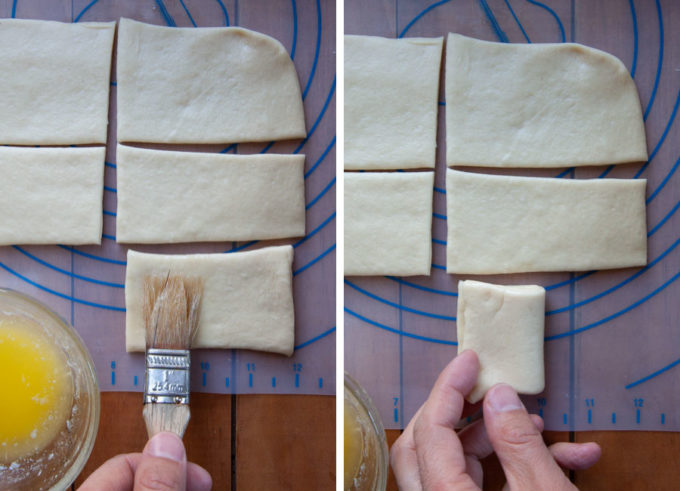
-
Place in the prepared baking pan, with the thicker folded end at the bottom of the pan. Repeat with the next dough rectangle, placing this one in the same orientation, overlapping slightly over the previous dough. Repeat with remaining folded dough, overlapping and creating a shingle row of dough, all the way up the pan.
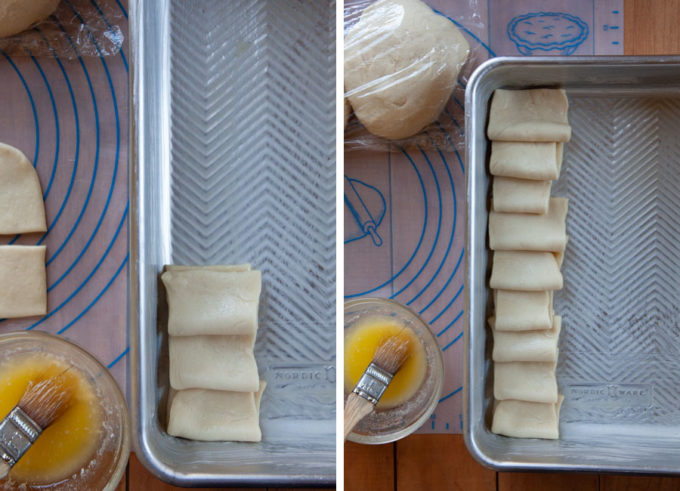
-
Repeat with the remaining three dough rounds. With the leftover melted butter, brush the top of the dough all over.

-
Cover the pan with plastic wrap. At this point you can refrigerate the pan overnight. Before baking, take the pan out of the refrigerate 90 minutes ahead of time and let it sit on the counter at room temperature. If you do not refrigerate it, let the dough rise for 30 minutes in a warm spot.
-
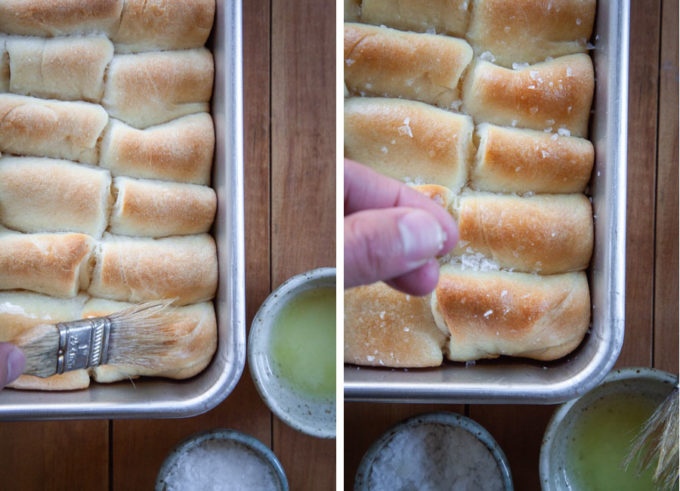
While the dough is doing the second rise, preheat the oven to 350F. Once the dough has risen (it will not double but it will look more puffy) bake in the preheated oven for 25 to 30 minutes or until the top of the rolls is golden brown.
-
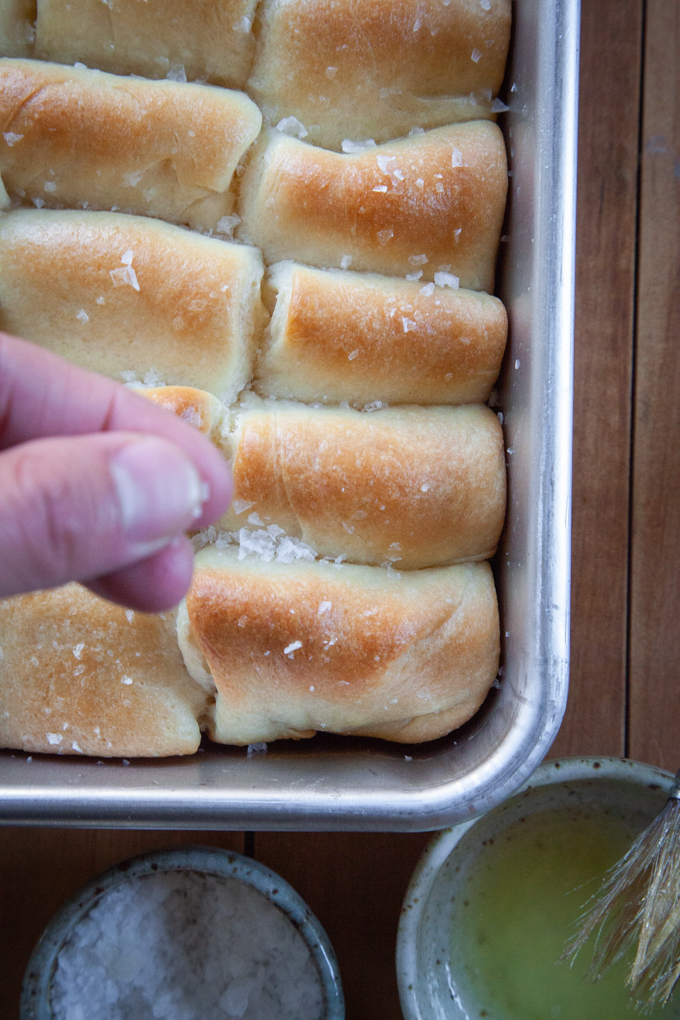
Once the rolls are out of the oven, while it is still warm, brush the top of the rolls with melted butter and immediately sprinkle with the finishing salt. The warm melted butter will help the salt to stick. If you find the butter is absorbing too fast for the salt to stick, just brush a few of the rolls and immediately sprinkle the salt before brushing butter over more rolls.
Notes
The post Parker House Rolls appeared first on Eat The Love.